Protecting your online Identity: FaceBook

This is the first in several posts about how to protect your digital identity online.

LOTS of buzz in the digisphere right now about companies like Cambridge Analytica data-mining people’s information from sources like Facebook. Let me give you a sense of how this all works and the actual personal risks associated with it, then some steps you can take to protect your information.

A big culprit on the radar right now is FaceBook. FB has a methodology where they keep track of what kinds of ads you click on and what links you follow, ostensibly so that they can provide you with information that appeals to you and improve your user experience.

For example, an ad might appear in your timeline for a Digital Doohickey, and you click on it. Hidden in the code is a tag for “digital”, “tech”, “doohickeys”, that is attached to your profile when you open the ad. Based on that, you are later offered an ad for Mechanical Doohickeys and also one for Red Doohickeys for Middle-Aged Bikers. You click on the second one, so FB adds a tag for “Red”, another for “Doohickeys” and ones for “Middle Aged” and “Bikers”.

Over time, the amalgamation of tags you acquire gives FB a good general overview of your interests, so they can get better at fine-tuning what they offer you. When these tags are combined with your profile information that you provided, it gives them a quite accurate cross section of you and your interests, as well as the billions of other FB users.
Screen Shot 2018-03-22 at 9.34.56 AM
All well and good, but it turns out that some companies have been given access to this massive database. Your own personal profile is absolutely lost in the billions and billions of data points, but those companies are able to gather general statistics from all this data….they might discover that there is a sizable group of people in the NorthEast of the US who like Justin Bieber, and have an interest in Doohickeys and things that are Red. So retailers start selling red Doohickeys with Bieber’s image on it.

Or more realistically, they start robocalling politically undecided households in predominantly left- or right- leaning neighborhoods with political ads to get them on board a specific agenda with effective marketing strategies. Then they also populate their Facebook pages with ads and articles that reinforce the message…you see how this works.

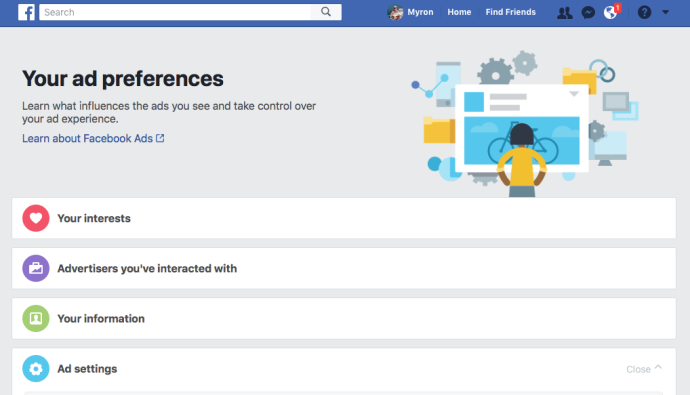
In any case, you might feel like FB has no right to track your interests this way. You can strip them of your tags, just be aware that it will also de-tune the customized ad experience they provide, and you will start seeing ads for all sorts of things you have no interest in. Here is the link to see your tag profile: just go through and turn everything off and delete all the tags. You may be quite surprised at how accurate a profile it is…I know I was!
https://www.facebook.com/ads/preferences/?entry_product=ad_settings_screen

Once you tidy this up, it’s probably best that you also DO NOT CLICK ON ANY ADS, and DO NOT ‘LIKE’ ANY POSTS any more, as that will merely start repopulating your profile. In fact, if you continually revisit that link, you will see the FB starts to randomly populate your profile with interests, in an effort to start creating your new set of interests. Best to just keep deleting those for a while.

Now the bad news….you also need to ditch the Facebook Mobile app. Installing that gives FB access to EVERYTHING on your phone, including your photos, your GPS tracking, your friends list (and everything on their profile), etc. In fact, whenever you add any mobile app, it has some essential information you must grant it for it to work. But it also ‘assumes’ you will give it other information. You can go into your FB settings and see what essential information these apps are mining. You should delete any app that you can possibly live without, and for all the rest, turn OFF any information they may be acquiring.

To check what these apps are harvesting, follow these instructions:
1) Click the down arrow in the top right, click on Settings > Apps (or go to https://www.facebook.com/settings?tab=applications&section=all)
2) In the top window, delete any apps you can live without
3) Go to “Apps, Websites and Plugins” and turn the setting off. This will prevent third party apps from accessing your friends’ data. It will also prevent you from logging into third party apps using your FB account, so be prepared.
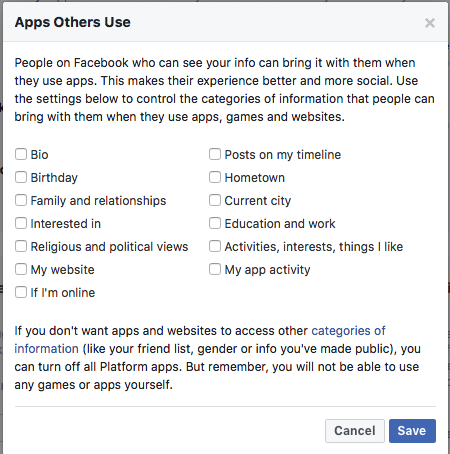
4) This is a big one….go to “Apps Others Use” and see what information about you other people’s apps will access. Think about this: when your friend signs up for MooTube, because you are in their Friend List, MooTube gets access to YOUR information!!

Turn ALL of these off!

Screen Shot 2018-03-22 at 9.47.24 AM

Moving forward, keep in mind that many mobile apps and ALL online personality quizzes are NOT there for convenience….they are data harvesting tools. You should NEVER do any online quizzes, and be very skeptical about mobile apps. If you cannot see how these apps earn revenue though ads, then consider that they probably earn revenue by selling your profile!

OK, that’s enough for now. I’ll add more later, but be aware that there is good and bad mixed together here. These FB customizations are designed to give you a better user experience (with ads that interest you, to facilitate your social networks, share info with friends that you have mutual interests with, etc). But they can’t do this without gathering information about your preferences…and just by using Facebook, downloading apps, and taking online quizzes YOU GIVE PERMISSION FOR THEM TO HARVEST YOUR DATA. And that database can be mined and used by outside agencies for other purposes.

While it is very unlikely that anyone can track specific information about YOU (because of the massive amount of data out there), there is no guarantee that unscrupulous people or future technology won’t be able to look through that data carefully and find out things you don’t want out there.

So go ahead and start removing yourself from the data pool. Its a tangled and messy process, and you will have to maintain your diligence, so keep watching this blog and I’ll add more things to help educate you.

Categories: Mac OS | Leave a comment

Finding Space-Hogging files

My students just introduced me to a fantastic tool for locating large files that may be hogging HD space. It’s called “Disk Inventory X” and can be downloaded for free from cnet. (It’s the green download bar on the left; don’t be fooled by the spam download bars)

Once you download it, run the .dmg file. You get a window where you can select the drive you want to inventory; choose your HD and select ‘open volume’.

Screen Shot 2014-04-09 at 11.16.56 am

A standard hierarchical view of your drive in the left pane shows you the total size of each folder or file. In the interface’s right pane is a colorful graphical representation of the types of files on your drive. Each file type is color-coded, so you can see how much space a particular type of file occupies. If you want to see all the tags and information associated with any file or folder, you need only click on it and a pop-up shows all the information the OS has on the item.

Screen Shot 2014-04-09 at 11.20.31 am

In my case, I saw a huge (35GB) folder that had a dozen videos in it, which was hiding in several layers of subfolders that I had imported when I moved from a PC to a Mac, and had transferred over through all of my computer replacements. I hadn’t seen or even thought of these videos for years, so it was easy to just delete them, and instantly I regained 35 GIGS of HD space.

Great program!

Categories: Mac OS | Leave a comment

Disabling Comments

The ‘Updates’ page is a true Blog page, in that (by default) it allows the reader to make comments so you can host discussions. You may choose to disable this ability so the Updates page becomes a non-interactive web page, like the others.

Remember that the ‘updates’ page is really just an index page with links to a bunch of subpages, each one designed to host a different topic. You have to turn off ‘comments’ in each post in the Updates page after you write it.

To do so is easy:

1) After you make and save a post, click on the dashboard and select <Posts/ All Posts>

Screen Shot 2013-10-29 at 5.05.40 PM
2) Then, beneath the post you want to disable comments on, select <Quick Edit>

Screen Shot 2013-10-29 at 5.08.20 PM
3) On the right hand side, you will see where you can de-select “Allow Comments”

Screen Shot 2013-10-29 at 5.10.22 PM

Do this for any posts or pages where you do not want comments active. 

Categories: Wordpress | Leave a comment

Deleting Old Posts

Getting rid of old posts on the “Updates” page is simple.

First, understand that the each of the posts on the Updates page is, itself, another page. You can see this if you click on the title of a post….it takes you to a different page where the post and all the threaded comments are. The ‘Updates’ page itself is sort of like an index page.

So to delete a specific post, just to to that Post’s page, and delete the page. It just takes two clicks.

1) Edit the post itself

Screen Shot 2013-10-29 at 9.57.54 AM

2) Move that page to the trash. It deletes the post in the Updates page.

Screen Shot 2013-10-29 at 9.58.06 AM

That’s it. Please delete all your old posts ASAP.

Categories: Wordpress | Leave a comment

Uploading Images from your iPhoto Library

This is a very common thing to do, and with a little care and prevention of common mistakes, you can upload very clear images.

First, in your ‘edit’ window, select “upload/insert”

Image

Then, choose ‘Select Files’ and navigate to “Photos” in the Finder popup bar under Media

Image

Choose the photo you want from your iPhoto library, and after it loads, you will see these options (if you scroll down):

Screen Shot 2013-10-18 at 9.11.55 AM

THIS IS WHERE IT GETS IMPORTANT. Select the image size you want (thumbnail, medium, large, full size) before you select “insert into post”. If you select it too large, you can always  reduce the image size later. But if you choose the default (Medium, 300×225) and then try to enlarge it later, it becomes very fuzzy.

HINT: You should pretty much never choose “full size”, as you cannot reduce the image size to get a bunch of photos to the same size. Reductions are given as percentages, so unless the images are all standard sizes beforehand, you can never get them to be the same dimensions later.

Once you select the size, hit ‘insert into post’ and Bob’s your uncle.

If you want to reduce the image size later, in the edit window, click on the image and choose a percentage of the original size. DO NOT OVER-REDUCE, as you cannot enlarge again later.

Categories: Mac OS | Leave a comment

Changing your banner image

You should consider changing your banner image on your WordPress site. It’s fairly easy, and really dresses up your site.

First, select and save an image. You can do a google search or use one of your own. Be sure to find one that can be cropped to the proper shape (short and wide) and still look appealing. Also, be sure the file size is large enough so the picture does not appear fuzzy. (Yes, I know the photo in my own blog is fuzzy….it was a bad photo that I took years ago, but I wanted to use it. Let it be an example of how distracting a fuzzy image can be….)

Screen Shot 2013-10-16 at 9.15.09 AMIf you do a google image search, when you scroll over the image, a popup on the bottom will tell you the image size. Choose one that is AT LEAST 1000 pixels wide….if you reduce an image, the quality does not deteriorate. If you enlarge it, it gets fuzzy.

Once you find an image that is large enough and can be cropped nicely, click once on it, then select “view image”. The you can download the image that appears to your downloads folder. NOTE: if you do not select ‘view image’ but merely download the image directly from google search, you are saving the tiny thumbnail.

Next, you should put the URL where you got the photo from on the image. This takes a little effort, but we are role modelling for our students, so it’s worth it. Here’s an easy way:

1) Double-click on the photo in your downloads folder to open it in Preview.
2) Select “Tools > annotate > text”
3) Put a text box where you want the credential to be in the final, cropped image.
4) Type in the URL from where you got the image. Feel free to make it a good color and size so that it is not distracting. If you want to put the “copyright” sign (©) in front of the URL, hit ‘Option / g”
5) Hit “Save” and close the Preview window.

Now, upload and crop that image:

Screen Shot 2013-10-16 at 8.58.38 AMIn your WordPress dashboard, navigate to “appearance/header”, and you can select the image to upload. Once it is uploaded, you get the option to crop it to size, and publish it.

That’s it. 🙂

Categories: Wordpress | Leave a comment

Uploading Documents to WordPress

For the most part, the documents people might want to upload are either Word/Pages docs, or PDF files.

Let me be clear about this right up front: WordPress makes it very challenging to upload PDF files….you are far better off if you upload (or embed) your documents as a Word file.

Embedding a Word document is simple.

1) Upload it to Google.docs
2) Set the sharing settings so that ‘Anyone with the Link can view’
3) Click “File/Publish to the Web” and start publishing
4) At the bottom of the window that pops up, grab the Embed Code (the one that starts with ‘iframe’)
5) Paste that code into your WordPress site in HTML (“Text”) view.

Here is what the final product will look like in your WordPress site:

(I embedded an image in the Word Document by taking a screen shot and pasting it in. That’s one good way to attach a PDF to your Word doc.)

However, if you choose to upload a PDF directly, it is possible.There are three ways to properly upload PDF document. Each has its advantage and disadvantage, so it would be a good idea to try all three so you can choose each one appropriately.

I will describe each method below, then you can watch the short video that recaps each method. It appears a bit complex, but really it’s not so bad. For the record, I think this all works best in Safari, but YMMV (that’s internet slang for ‘your mileage may vary’)

Method 1) Upload the document directly to the WordPress site.

  • Click on ‘Add Media’
  • Select your PDF file to add to the library
  • Click ‘insert into post’

ADVANTAGE: This is the easiest and most intuitive method
DISADVANTAGE: Instead of an embedded document, you will get a link in your post that lets the user download the file to see it, like this:

.Demo PDF file

Method 2)  Upload the PDF to Google.docs to get an embed code, then embed it into your post.

  • Navigate to google.docs (or google.drive), and select the ‘upload’ icon

Screen Shot 2013-10-12 at 10.47.37 AM

  • Select the file you want, and upload it.
  • When the ‘progress box’ appears in the bottom right, select “settings; convert file to google docs format”
  • Open the uploaded file, and set the sharing settings so that ‘anyone with the link’ (not just HKIS users) can view.
  • Then go to ‘file’ and ’embed this PDF file’. (You may not be offered that choice, but be offered “File/Publish to the web” instead. If so, choose that), then copy the embed code provided.
  • Be aware; you may have to use “edit/copy’ as Control-C and Control-V do not work in some browsers at this stage.
  • Navigate to your blog, go into HTML view, and paste in the embed code (use ‘edit/paste’)

ADVANTAGE: Despite how it looks, this is actually the easiest way to get the document embedded into your post where you want it. You also get a scroll bar for really long documents so they don’t take up a ton of space on your page
DISADVANTAGE: Lots of little settings things you have to watch for, and the uploaded PDF file can be very large, and has the thumbnails in the left margin which uses up space on your page, like this:

Screen Shot 2013-10-29 at 5.20.40 PM

Method 3: Change the PDF to a series of jpeg images, and insert them like photos. This is MY FAVORITE method.

  • Open your PDF in Acrobat, and ‘save as/JPEG’
  • In WordPress, choose ‘insert media’ and select the saved jpeg file. If the file has multiple pages, you can select them all at once and upload them
  • Insert the jpeg(s) in the order you want into your page.

ADVANTAGE: You get an in-line embedded document; probably what you are wanting
DISADVANTAGE: You have to upload and embed each image in order.

Demo PDF file jpeg

Here is a movie that shows these methods more clearly.

Categories: Wordpress | Leave a comment

PRAM reset

Parameter random access memory (PRAM) holds information about the configuration of your computer, including things like the date and time, as well as desktop, volume , mouse, and other control settings. It’s powered by a small battery, so these settings don’t get lost every time you turn your computer off.

If you find your computer getting laggy, a good regular maintenance task is to do a PRAM reset (also called a NVRAM reset). It’s incredibly easy to do, and will often fix a host of strange issues. When combined with doing an SMC reset, its amazing how much it can ‘tune up’ your computer.

To reset the PRAM, follow these simple steps:

1) Turn off the computer properly (apple menu, “shut down”) and let it shut completely down.
2) Press and hold these four keys: Command, Option, P, R. (I do this with one hand…its like doing the Vulcan Mind Touch).

Screen Shot 2015-03-04 at 12.31.40 PM

3) Turn on the computer, still holding down those four keys.

The computer will chime, then shut down and try to restart again. Keep holding the keys until after the third chime.

That’s it. I often do a PRAM reset right after doing an SMC reset, just to keep things running smoothly.

Here’s a video in case you need to see it:

Categories: Mac OS | 1 Comment

SMC Reset

Resetting the SMC (System Management Controller) is very easy and solves a host of problems. The SMC controls things like;

  • screen brightness settings
  • volume calibration
  • battery charging settings
  • fan speed and interior temperature settings
  • touchpad sensitivity
  • keyboard sensitivity

If you are having any issues at all with the battery, charger, screen brightness, audio, keyboard, trackpad or many other components, an SMC reset very often fixes them.

TO DO THIS, follow these three very simple steps. Start with your computer TURNED OFF.

1) Plug in a power supply. It doesn’t matter if the light is green or red.
2) Press SHIFT, CONTROL and OPTION and hold them down.
3) Quickly press the power control, as if you were starting up your computer. You can let go of shift/control/option after you release the power button.

That’s it.  If your power supply indicator is red, it turns green for a few seconds then turns red again…this is because for a few seconds, the battery is disconnected from the charger cable, so the cable registers the computer as ‘charged’. The indication that you did a successful SMC reset is that the computer DID NOT TURN ON even though you pressed power.

After doing an SMC reset, its always nice to do a PRAM reset.

Then, just start up the computer.

In case this is all too wordy, here is a video showing you the steps. Try it.  🙂

Categories: Mac OS | 1 Comment

Google Alerts

Another short and sweet idea. Next time you or your students are looking for recent web content (for example, breaking news about a typhoon or a mall seizure in Nairobi), you can put in a ‘Google Alert’.

Image

Google Alerts are email updates of the latest relevant Google results (web, news, etc) based on your queries.  (I copied that from the Google Alert page).

The interface is EXTREMELY simple; just put in your search query, tell it how often to search and how many results to send you, and it sends you an email update if there are any new results. A great way to stay informed of breaking events.

The page for Google Alerts is http://www.google.com/alerts

Categories: Google Tools | Leave a comment

Create a free website or blog at WordPress.com.